 Originally, this mirror back was going to be used in our boys' bedroom makeover that had an industrial feel. You can barely see it, but we had already drawn on the word "GULF" as we were going to turn this into a vintage appeal gas station sign. In the end, we didn't end up using it, so faux clock it is.
My mantel has been...well...neglected. I haven't done much to it since my fall design and Christmas, but now it needs a summery makeover, don't you think?
Originally, this mirror back was going to be used in our boys' bedroom makeover that had an industrial feel. You can barely see it, but we had already drawn on the word "GULF" as we were going to turn this into a vintage appeal gas station sign. In the end, we didn't end up using it, so faux clock it is.
My mantel has been...well...neglected. I haven't done much to it since my fall design and Christmas, but now it needs a summery makeover, don't you think?
 Enter in my new faux clock...I love it!
 The best part about this new faux clock is that it is totally doable with materials from your local home improvement store. Also, it even has the potential to be a working clock too (see below).
DIY TIME
Here is what you need:Materials:
- 1 - 4' x 8' sheet of hardboard (it comes in 1/8" or 3/16" thickness, either will do) Don't forget they can cut it down for you at the store.
- gray paint (or whatever contrasting paint you like)
- white paint
- metallic paint
- Roman Numerals printed out in Abraham Lincoln font at 384 pt. and prepared using my transfer method
- clock hands printed to 18" for the minute hand, and 8" for the hour hand
- 5/16" dowel
- wood filler (optional)
Tools:
- jigsaw
- drill with a 5/16" brad point bit
- no. 5 round brush
- hacksaw
- mounting hardware if you wish to hang on the wall
LET'S BEGIN
First, you want to cut yourself a 27.5" (or size of your choice) from the hardboard with your jigsaw. Good news is that you can make several of these from the same board. I also use this board to make my chalkboards and other signs too. Then, I need to fill the holes with wood filler.
NEXT STEPS
Next, you want to create a base coat using your gray paint or contrasting color of choice. Once your first coat is dries, use your white paint to dry-brush a light coat over top. *to dry brush just get the tip of your bristles slightly coated and lightly wipe side to side while leaving some of the base coat peeking through* Now your clock face is ready for the numbers you have already prepared using the tutorial linked above in the materials list. Last, I laid my numbers out and did a visual check leaving about a ½" margin around the outside edge.
 Paint in the numbers using whichever color you prefer. I used the same color as I did for my base coat.
At this point, you can do one of three things: (1) trace and paint your hands on the face (2) buy a clock works to fit your clock to make it actually run as a real clock (3) make some 3-D hands yourself.
For the option 3, your next step is to create the clock hands using the template you created from the materials list above. Next, trace your clock hands onto a piece of your remaining chipboard and cut out with your jigsaw. I can't tell you enough how much I love my Kreg Clamp Trak on my DIY workbench. They totally make cutting with a jigsaw a breeze.
Paint in the numbers using whichever color you prefer. I used the same color as I did for my base coat.
At this point, you can do one of three things: (1) trace and paint your hands on the face (2) buy a clock works to fit your clock to make it actually run as a real clock (3) make some 3-D hands yourself.
For the option 3, your next step is to create the clock hands using the template you created from the materials list above. Next, trace your clock hands onto a piece of your remaining chipboard and cut out with your jigsaw. I can't tell you enough how much I love my Kreg Clamp Trak on my DIY workbench. They totally make cutting with a jigsaw a breeze.
ASSEMBLY
Now, this would be the best time to add any wall mounting hardware before you add the hands or works. Then, to attach it all together, I drill my clock hands and center of clock with the 5/16" brad bit. After that I use a short length of dowel as a center pin. However, before you attach them together, paint your faux clock face hands and dowel with the copper metal effects kit. (or whatever color and finish you choose) As a matter of fact, here is the same copper patina on my repurposed rooster weather vane, and I also used in on this Art Deco vanity.

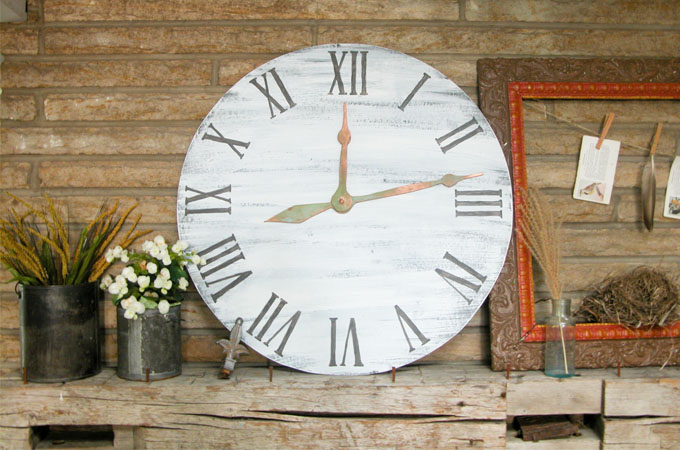
THE REVEAL
Finally, here is our super fun and easy giant clock face.
 Isn't that patina gorgeous? I'm slightly addicted. tee hee.
 Okay, so I have to tell you that I simply shopped my home to make this mantel. Most everything is either found or cost a few bucks at the flea market or thrift store.
Also, my old paint pails are my favorite planters with faux stems from the dollar store and a small plant from a Mother's Day banquet.
Okay, so I have to tell you that I simply shopped my home to make this mantel. Most everything is either found or cost a few bucks at the flea market or thrift store.
Also, my old paint pails are my favorite planters with faux stems from the dollar store and a small plant from a Mother's Day banquet.
 Not only did I have fun sourcing natural items, but also this frame was found during city clean up along with my recent credenza makeover. I think it works perfect with our love for birds.
 Further, my flea market sifter screen with botanical prints and magnets fills in the gap nicely on the side.

 I am so happy with the whole look and hope you enjoy it too. Even more, you don't have to break the bank to create your style. Just get thrifty with it!
 Furthermore, if you love this clock idea, then you'll also love this faux clock face table my youngest son and I did here from some trashure.

[metaslider id=30251]
SHARING
Above all, pin and share this tutorial so you can whip one up to impress your friends. You can even make one for them too! ♥ Additionally, next week is Trash to Treasure time and I will be giving this cedar chest new life. It was left for dead in the trash and is one of the grossest pieces I've had yet. Come see HERE!
 To get these DIY tips & tricks in your inbox, be sure to sign up for my newsletter. PLUS, you will get your FREE Furniture Buying Checklist and special discount to my shop. Until next time!

Also, more of my handiwork like my faux clock:

