 Not only is this linen tank top three times too wide for me, but it also wouldn't withstand altering to suit me either. I'd have to take it apart completely to shrink the neckline and draw in the side. nah. I'd rather use it for something more fun. Also, if you remember, I have quite the infatuation with all things linen. (my first purse, my smock, my channel-back chair makeover, and all other projects linen see HERE). It's a fantastic fabric to work with, is super comfortable in clothing and upholstery, and wears wonderfully.
 Notice the one tag...I'll be saving that for my end project. tee hee.

SEW FUN
First, I know that not everyone would see a sling bag in a shirt. However, my goal today is to inspire you to think outside the big bad box store when it comes to creating. While I will admittedly say the fabric/craft stores are super fun to go to, it isn't necessary. I even skip the box store to support local. Wouldn't you rather shop in a store built out of reclaimed wood set in the countryside? (my favorite place to go)
*post includes affiliate links so you can find the products I love to use too. (see full disclosure)
However, I also prefer to upcycle fabrics. Why pay retail when you can reuse thrifted fabrics - even when brand new fabric can be found? People donate unused yardage all the time. Okay, so next time you want to create you can use your family's loved ones articles of clothing, those drapes you're not using, or those old pair of jeans you love. So you may be wondering why I want to create a DIY sling bag? Well, I need another purse/bag since my old one is looking sad. Since I prefer to make my own designs, it's time to hit the sewing machine. While I could literally just sew up the bottom of this linen tank top to make it into a tote similar to my reusable shopping bags made from tank tops, I want different. The idea is the fabric is allowing you to create whatever you want with any pattern. Today, I'm sharing how I made my sewing adventure. Fun fact: did you know I started my Etsy shop over 11 years ago with bags and dolls before starting a blog? Now I have both blog and shop on my own site.
TOOLS & SUPPLIES
- your choice of fabric - feel free to mix it up
- your choice of pattern - I used this one HERE or design your own
- hardware & notions - patterns will list that for you
- coordinating thread
- fabric scissors
- tape measure
- seam ripper
- fabric marking pen
- pencil
- fabric clips (genius invention)
- sewing machine with zipper foot and 90/40 needle
WHICH TO CHOOSE?
Then, as soon as I had my pattern, I'm set to get my cut on. woot! While I'm obviously using that gorgeous tank top, I need more than that. I head to my stash to pick a lining fabric. I have this modern linen I used on a vintage footstool as upholstery. Or I can use this vintage curtain I've had for a decade or so since I used it to make my sewing machine cover. My cover ain't perfect, but it was a first attempt when I was learning how to sew. It has an opening on the top for my handle to peek out and pocket on front for necessities.
 With that in mind, I choose the vintage curtain since I'm all about refashioning today. Plus, I like the smaller print as an interior. I may use the other for an exterior fabric to make as a gift.
Next, I also need my hardware. Again, I'm all about upcycling and I ran to the thrift store to see if I could find a cross-body bag with hardware I could use. BINGO!!
With that in mind, I choose the vintage curtain since I'm all about refashioning today. Plus, I like the smaller print as an interior. I may use the other for an exterior fabric to make as a gift.
Next, I also need my hardware. Again, I'm all about upcycling and I ran to the thrift store to see if I could find a cross-body bag with hardware I could use. BINGO!!

 It was the only bag in the store that had exactly what I needed. I call that a God-wink. All I need to do is reuse the strap, rip out the hardware, and I'm good to go. What could be easier and more affordable than that? In addition, the rest of the bag is like new so I donate it to a local ministry. Here's what I salvaged, plus a zipper from a wicker bench cushion I redid, and two zippers from my stash of zippers. I bought 20 zippers of 10 different sizes and colors and they have been SO VERY handy to have.

CUTTING TIME
Finally, it's time to begin the fun. I will say cutting patterns is my absolute least cherished part of sewing. meh. It's like prepping a room to paint. It takes forever, has to be exact, and is so worth the effort. Notice I have just enough fabric for the outer lining {{fist pump!!}} However, I get to pull out my DIY pattern weights (large washers wrapped in fabric scraps) while I sing my heart out cutting the outer fabric, inner lining, canvas (used as interfacing), and adhesive interfacing. Need I say blisters ensued?
 I mentioned that I'm using canvas as "bones" for my bag. The pattern calls for woven interfacing. I'm using all I have on hand, which is Heat n' Bond Ultra Hold fusible interfacing. First, I trace the pattern on the canvas true to pattern size. However, I cut it out following the seam allowance. After that, I use the canvas pieces to trace onto the adhesive and cut those out as well.
 Last, I iron the adhesive onto the canvas, peel off the paper backing, then iron onto the linen. This allows me to stitch through less layers, but still get the stability of a heavier canvas. Additionally, the pattern video uses a waxed canvas...oooh...I'd love to try that someday.
JAMS & JELLIES
One more bit of fun, k? Many years ago, I spied this box at a garage sale. I didn't care about anything but the box. If you didn't know, Smuckers headquarters is located in Ohio and brings back many memories. Can you imagine getting this full of tiny jars of jams and jellies? mmm... Little did I know the fun inside. This box is full of vintage trims, bias tape, seam tape...even elastic for a garter belt and hosiery! Those were the days...haha. So, when this pattern calls for bias tape to hide raw edges, I excitedly pull out my stash.
 I found one a tad wide but will do the job since this is not only for me, but also good practice.

NEARLY THERE
So... I have a confession... I got so wrapped up in working on this that I couldn't put it down. It's been so long I've created a project for me, and all was going so well. Not only could I not sleep due to being excruciatingly sore and bruised from splitting wood the previous day, but the bag was calling me...really. Here is where I was at 2 am with right sides up. ahem. No worries, though, that night I went to bed super early and went back to bed shortly after assembling all the pieces.
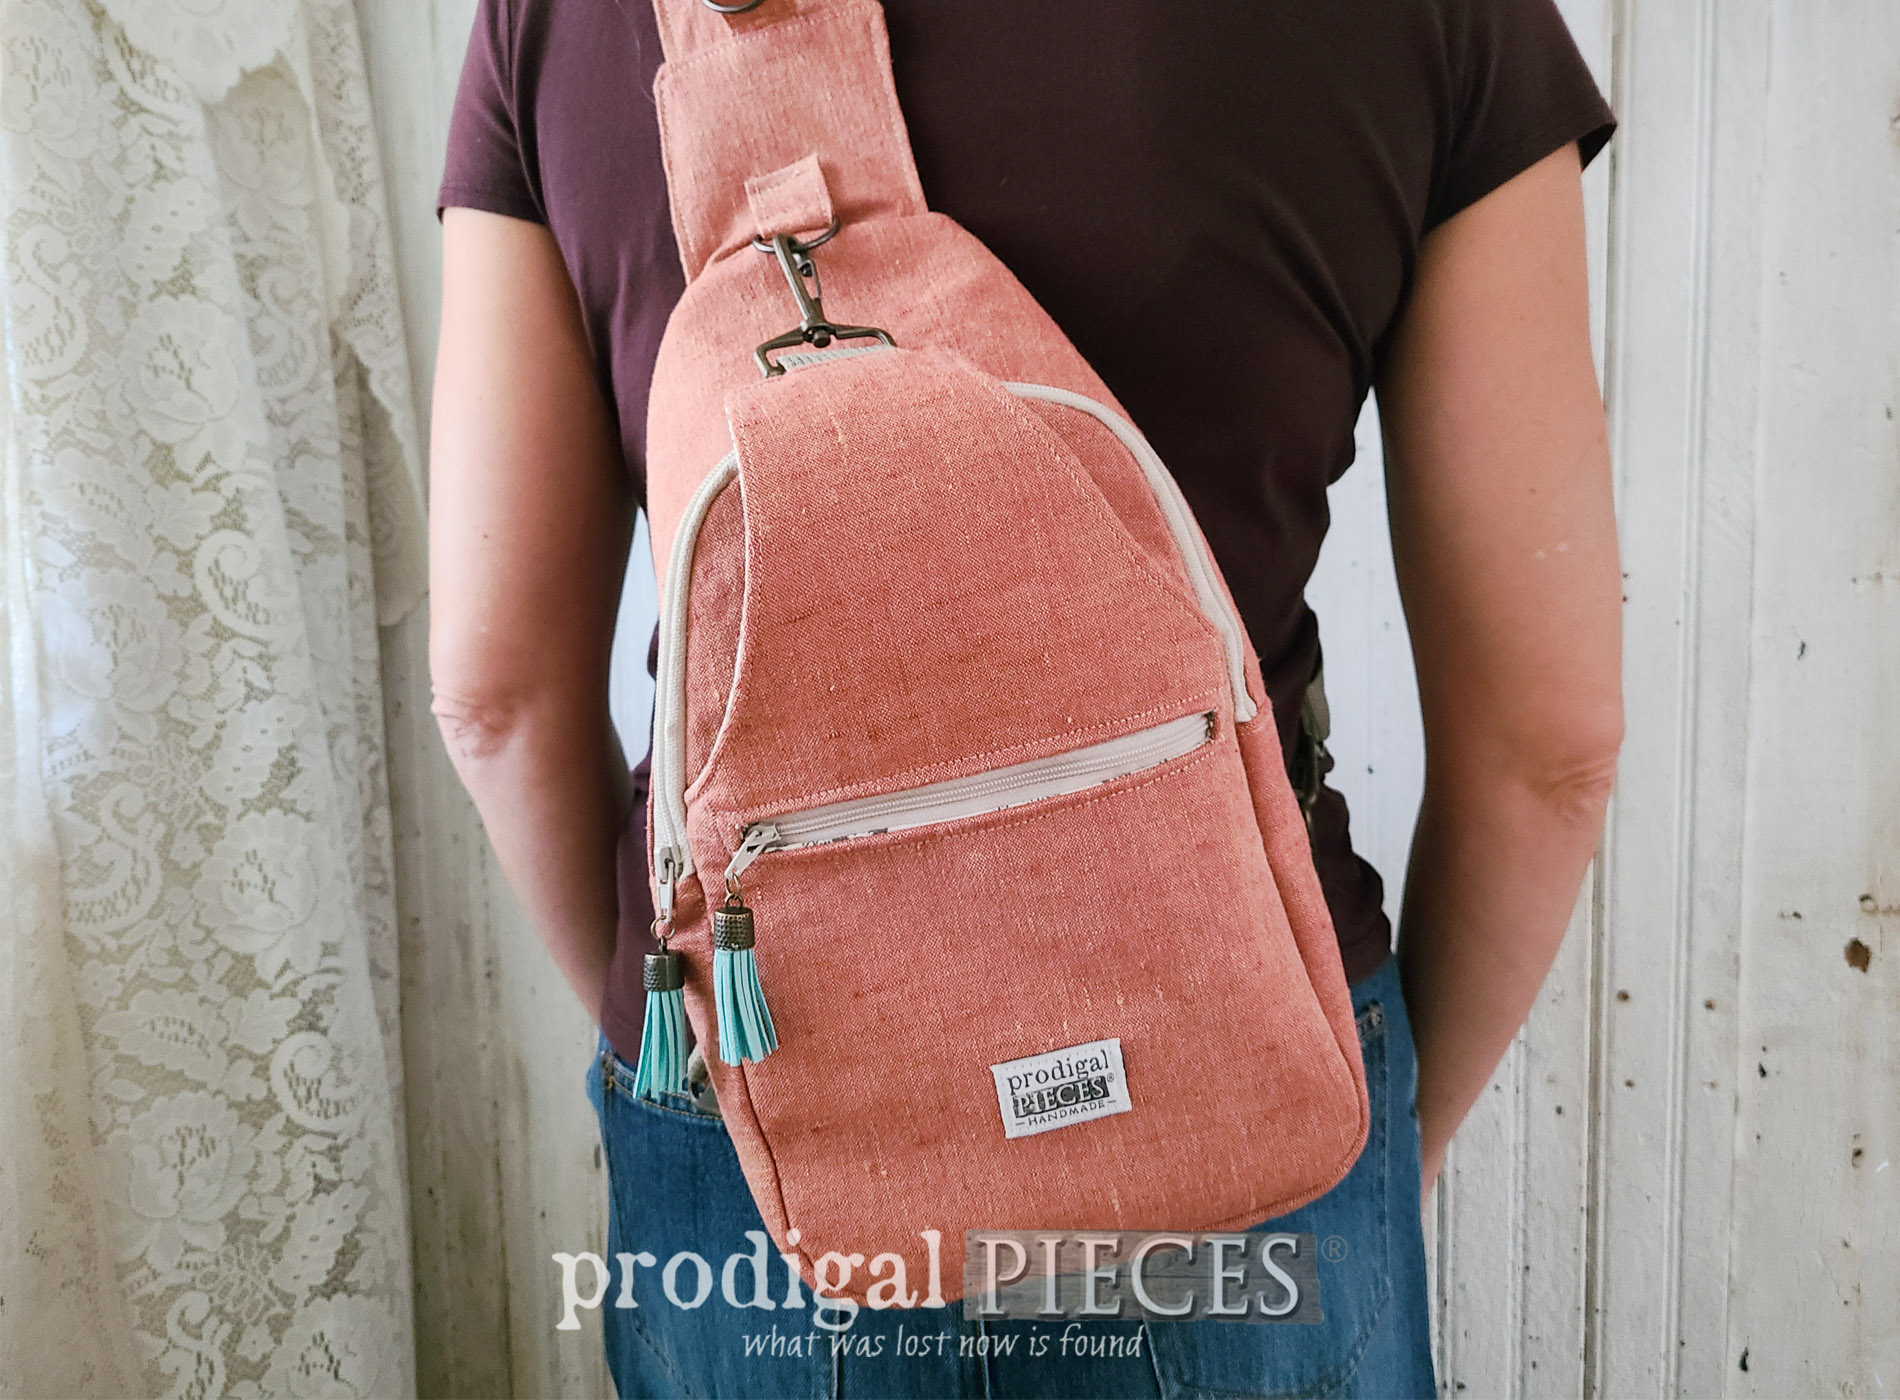
Here's my DIY sling bag made for the cost of the pattern, the thrifted bag, and sourcing my stash - less than $10. You can't beat it! (warning: picture overload)
No worries, though, that night I went to bed super early and went back to bed shortly after assembling all the pieces.
Here's my DIY sling bag made for the cost of the pattern, the thrifted bag, and sourcing my stash - less than $10. You can't beat it! (warning: picture overload)


INSIDE
Is it perfect? Not at all. Is it mine. Yesssss. Therefore, that cancels out the first detail. I can honestly say I only ripped out two stitches in the sides of the bag, so I'm ecstatic with the outcome. The video tutorial and pattern were very easy to use - mind you, I've had plenty of sewing experience. That means, I know you can do it too. You can choose this pattern or a whatever suits your fancy. This one is adaptable to both guys and gals, just pick fabrics to make it your own. Did you notice the pop of aqua? Those are from Tammy, a reader who was downsizing her own stash and sent my daughters and I box of "gold". They fit my project perfectly!
 Now you know we can't be friends if you don't also go ga-ga for pockets. This DIY sling bag has oodles places to tuck your essentials here and there.

 Oh, and I also added this feature in my bag lining side seams from that thrifted messenger bag so I can hang my keys. In addition, remember that tank tag I said would show up?
 nuff said. Okay, I'll stop with the pics, but let me just say that the whole point of Reduce, Reuse, REFASHION time is to inspire you while having fun. I'm eager to give this bag design another go for gifts and maybe another for me. I have a bunch of wool tartan, amongst other fun fabrics, also sourced from the thrift store years ago that I used on my lunch bags.


SHARE
After leaving me some comment love below, take a minute to pin and share this DIY sling bag project. There are others out there who need a little bump in the behind to try something new too. Meanwhile, don't forget to sign up for my FREE newsletter so you can see, as promised, what I do with these leftover spindles. HEAD HERE! Until next time!


Also, more fun refashion projects like this DIY sling bag refashion:

