
 At this point, I've cleaned up a bit, added mulch, and a few flowers here and there. Isn't my table looking mighty worn? I think staining pressure-treated wood never lasts long (even after wood is aged). Whereas a certain product stain doesn't seem to work on flat surfaces, I'm confident paint will be better based on previous experiences.
DIY TIME
First, it's time to do some deep cleaning. Because of the way our downspouts empty onto our patio, it makes pressure-washing a necessity. Every other year we do this because the tree droppings and runoff make it kinda gross. eewwww... Last year, I bought this gift to self (aka. electric pressure washer) when I saw it drastically discounted. Anyone else love the therapy of blasting muck off of stuff? Best part my 6 kids love to help too, so it makes the job even more fun. Many hands make light work is how it goes, right? That is my middle daughter having her turn.
 Do you hear that sigh of relief. The pond odor and green cast is now gone. Plus, I hung up my outdoor curtains.
 If you remember in a recent post, I built a reclaimed planter for my fence as seen below. In addition, however, I also have a teenie tiny sectional that does not fit my family of 8.
 It's a super cute set that I purchased with my winnings from a Bob Vila contest I won a few years back. After a few years of making it work (and saving my pennies), I have been waiting to build my very own DIY patio sectional. I've been requesting it for my birthday for a few years, so since it wasn't going to happen unless I did something, today's the day.
NEXT STEPS
Next, per my normal, I'm working hard on my birthday just like last birthday when I was spray painting inside our garden shed remodel. Thankfully, we are able to make use of Ana White's fantastic site offering free build plans. We've used her bench plan for our patio table. For our needs, however, we are changing the plans up a bit to suit our space and the dimensions. I found that the seat she built was 25" which is fine. However, I couldn't find a seat cushion for just the seat for less than $70. Whereas the 24", I found a seat and back cushion set for $50. BINGO for me. As an offset, lumber is ridiculously expensive now, so we spent about $300 in lumber and screws. Your cost would depend on the size you are building. Here's how we altered the setup using all 2" x 4"s.
BUILD ADJUSTMENTS


- Seat frame:
- 2 - 23"
- 2 - 21"
- Seat legs:
- 2 - 13 ½"
- 2 - 27 ½"
- Top of Rear Legs: 1 - 24" (connected with pocket joints from underneath)
- Outer Seat Trim: 2 - 24" (2"x 2")
- Seat Slats: 7 - 21" (approx. 3/8" space between each)
- 6 slats connect to trim with pocket screws underneath
- 1 slat connects at seat rear with pocket screws
- assemble seat slats to trim pieces, then connect to frame with pocket screws
- Corner:
- Legs: 2 - 27 ½"
- Top: 1 - 28"
- Seat Apron: 2 - 22 ½"

 Again, I can't say enough how awesome it is to have our kids pulling up the rear in all projects we do. While we are building like crazy folks, my younger set of kids tackle sanding down our patio table set. They're not new to my tools or to hard work. What a crew! We've had seemingly endless days of rain here with more on the way. So, their help is like gold to get this done quickly.


 After the sanding is done, I paint the tops with a fresh color that will be easy to wipe down and update my set. Likewise, my pallet reclaimed wood coffee table that houses two antique washtubs for storage needs rebuilt. So, I get that done as well.


SPRAY TIME
Then, I got into a rhythm, we complete the set and take a deep breath of relief. Seating for 8, please!
*post sponsored by HomeRight (see full disclosure)
Isn't it gorgeous? The wood is pretty green yet from treatment. However, I'm confident the stain I'm using is perfect. Finally, it's now time to bring out one of my favorite tools, my sprayer. As you know if you've hung around me for long, I'm smitten with sprayers. They make jobs a breeze! (literally) To start, I turn the set upside down to knock out the bottoms first. I fill up the canister following manufacturer instructions on thinning. When spraying, it's best to start spraying before hitting your project, then continue off. Also, hinge at your shoulder and not your elbow or wrist. This promotes even coverage and a great workflow.
 Notice I'm using the same color stain as I use on my pergola. I love that dark color called Cordovan Brown. My first coat is on in less than 30 minutes, and no having to brush in those slats just like in my mudroom makeover. woot! I quickly apply the second coat in two hours and my set is stained and ready to go in less than half a day. I may have stood on it and did a happy dance!!

THE REVEAL
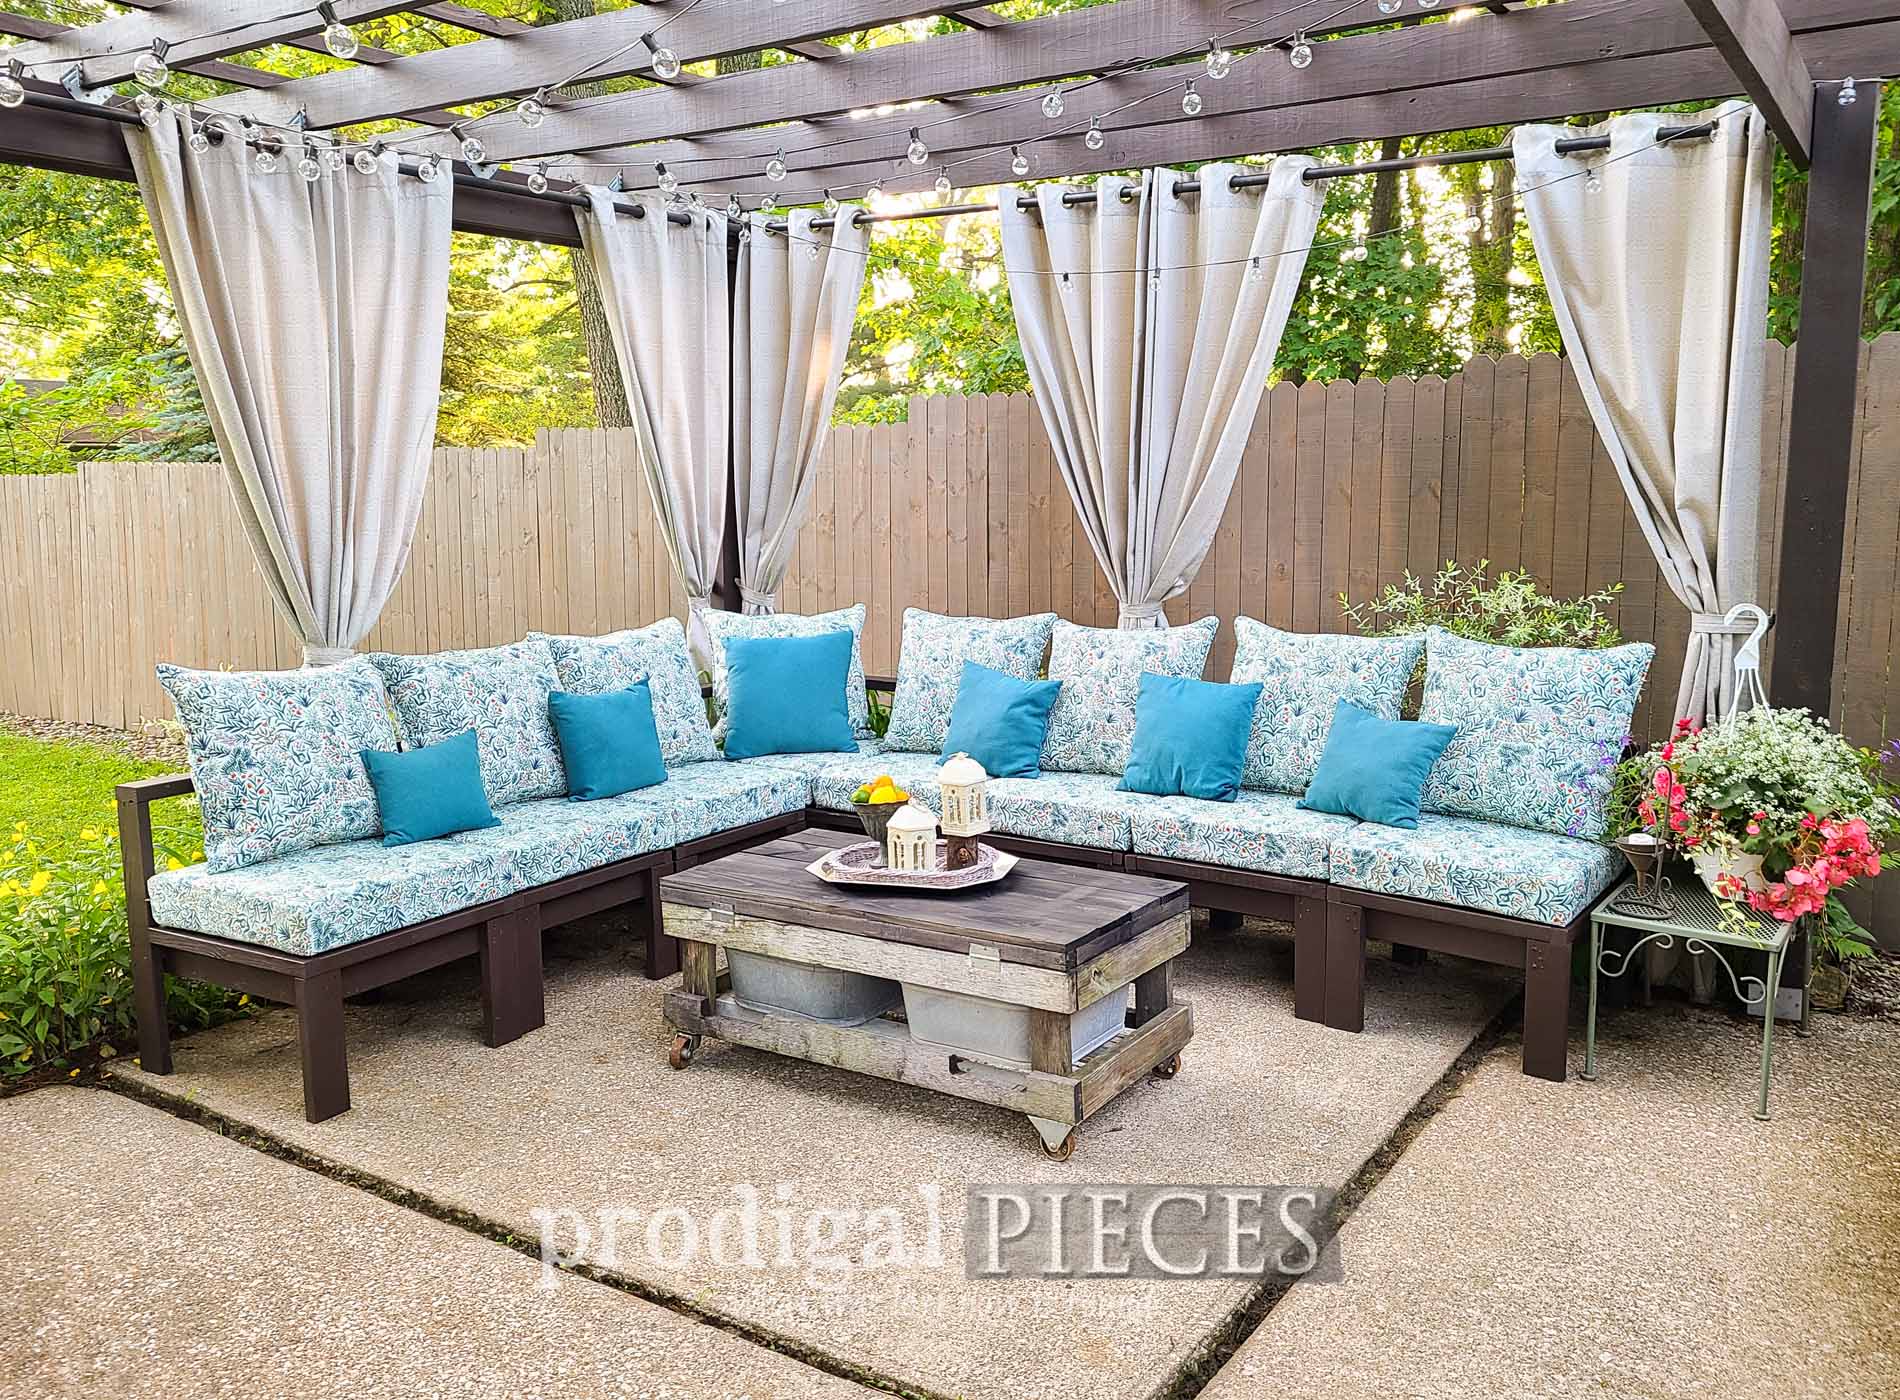
Finally, after a bit more cleaning up and elbow grease, our DIY patio sectional is ready for those long summer days of fun.
 That feeling of our family team working together to make this happen is surreal. I have the best gang! Bonus, my birthday gift to self is finally complete so we can all sit together.

 Also, my coffee table is rebuilt for many more years, and my patio table and benches look renewed.

 Who's coming for dinner? We're ready! This is surely a set that will last us for ages as long as we take care of it. In addition to the added function on our patio, we saved HUGE. These sets were way more affordable for the 24" size than if we had built them to have a 25" cushion.


 Aside from just getting this done for our enjoyment's sake, I truly want to inspire you to give building a try. With basic 2" x 4"s, and a set of tools, the sky's the limit. All you need is the willingness to learn, and time invested.


SHARE
In addition to leaving a comment below, do pin and share to inspire others. I'm sure there are others out there who would love this too! Up next, this vintage glass tray is about to get a makeover. See the end result HERE.
 To get these DIY tips & tricks in your inbox, be sure to sign up for my newsletter. Until next time!

Also, more build plans for your outdoor decor like this DIY patio sectional:

