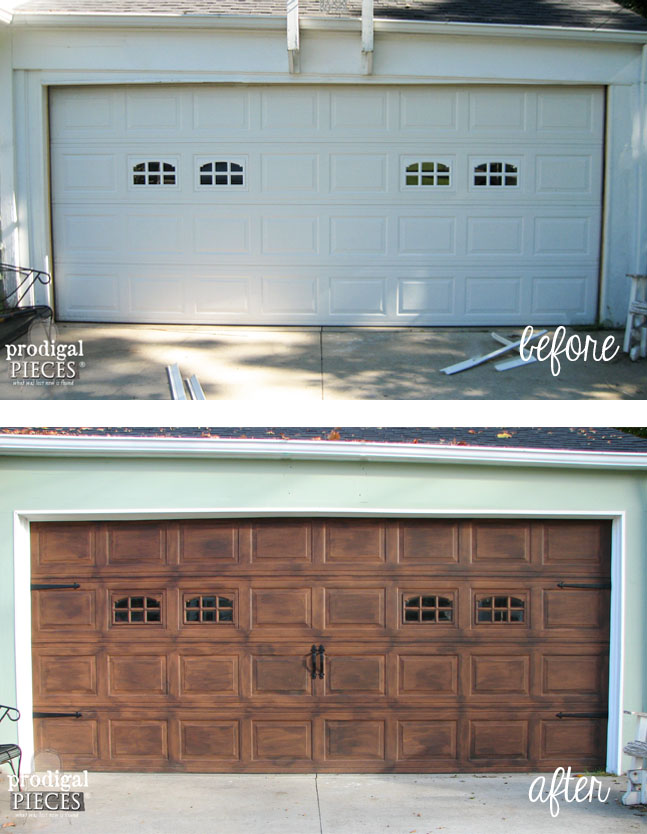
It has long since been my husband's and my desire to give the exterior of our home an overdue makeover. When we originally purchased our house we didn't have a garage, but a carport with lattice as a wall on the one side. A few years ago, we walled in the garage and added a builder grade garage door with carriage windows. That suited our scheme, but once we got to work adding a new color and stone veneer, that BIG white door just didn't suit the rustic feel we were after. I wanted a faux wood garage door, and I decided to DIM (Do It Myself). Here it is in its prep mode.

I wanted some curb appeal, some I-don't-look-like-I-came-from-the-big-tool-store-type attention. Mind you this was a vast improvement over no garage door which showcased our auto loveliness.
Since it is the norm for me to add texture to the pieces I paint with glazing for
my online shop, one day I thought to myself, "Why not the garage door?" So off I went to create a faux wood garage door.

DIY TIME
Luckily our custom garage door we chose a few years ago already has a wood grain inlaid to the panels. Then, with some paint, I made our garage door look like this...

Want to give this faux wood garage door a try? I'll show you how.

Here's what you'll need:
- burnt orange, caramel flat exterior paint - the paint I used was a second's paint from Home Depot called Caramel Swirl. Since this is your base, you don't have to be exact, but in a similar color family.
- dark chocolate, brown flat exterior paint - again, another seconds can for me, but just pick a deep contrasting brown.
- cotton rags (old t-shirts work the best)
- gloves
- paint brush (& artists brush if needed for windows)
First, check the back side of your garage door for a label that will give you instructions on how to prepare your garage door for painting. If no label, just make sure to fully clean the surface of dirt and debris. Also, remember I already had a wood grain design on my door...this could be done on a flat surface, but would take different steps to get the desired effect.

In the above photo, I'm showing that the bottom three panels are second coated with the top still needing a second coat. My neighbor's little boy walked by and said, "I like your orange garage door!"
Ummm...yes it was orange, and yes my neighbors thought I was going to leave it like that. Gotta love neighbors...can I hear an amen?
DETAILS
Using an artist's brush to get to the fine details helped make it easier to get around those windows. I'm also not the type to use tape to mark it off with painters' tape, but you could do that if you like. I worked on a paint crew and have learned the nuisances of painter's tape, and that a steady hand prevents you from needing it.

Additionally, make sure you're applying your coats in low heat sunlight and try to avoid the hottest part of the day. The curing will go much smoother in a cooler setting. We have a southern facing garage and I had to make sure to do it early in the day before the paint would bake.
On to the fun part...adding the depth. I don't believe in buying super-expensive glazing, I just make my own. Glazing is really just paint with an additive to lengthen the dry time of the product. I have just learned to work around quickly and in small batches. So buy a dark glaze if you want to "buy" more time.
GLAZING
As far as mixing my own, I've had several questions as to the amount of water I add to the paint. I don't have exact measurements since each paint is different, but I took about 2 cups of paint and mixed in roughly 2 tablespoons of water. It's just enough to give it flow and the consistency of milk. If it's too thick, add tiny amounts of water, and if too runny, just add more paint.
Okay, so you'll need that homemade glazing you made, some cotton scrap cloths (t-shirts), and a paint brush. The technique is simple, but takes a bit of time.
First, apply the glaze using a fully loaded brush and work in small areas at a time. For me, I worked in one panel at a time. What is more, feel free to try a test spot before you go whole hog.

Then, after covering one panel, grab your cotton rag and then lightly wipe the glazing off. You'll be leaving some of the glaze behind to fill the grainy texture, giving it the wood grain effect.


Here is my partially finished door. Again, the neighbors are peering out their windows wondering what in the world I was doing. The entire time I'm doing this I'm singing to myself John Denver's song..."country road, take me home, to the place where I belong..."
ALMOST DONE
My heart is in the country!

All it takes is only one coat of glazing, the garage door is finished and just needs a couple of days to cure.
Since a rustic look was what we were going for, we also added some carriage door hardware. Not only can you find it at any home improvement store, but it also comes in different variations.

I just love how my faux wood garage door came out. A few mistakes I made was trying to touch up some spots - better left alone. ahem. But...I learned and am so glad I took this project on.
THE REVEAL
Now the neighbors are oohing and aahing and wanting theirs done too! ha! I love it.

Got questions? Please feel free to ask and I'd love to see yours if you give it a try!
UPDATE: For those of you that have a flat surface door to work with, you can use wood grain tools using the same color that you would use to glaze with and create the grain that way.
3 YEAR UPDATE: The garage door is holding strong, and I show you the 3-year anniversary update
HERE.
Before you go, be sure to
sign up for my newsletter. Until next time!

While you're at it, here are more projects for you like my faux wood garage door:


 All it takes is only one coat of glazing, the garage door is finished and just needs a couple of days to cure.
Since a rustic look was what we were going for, we also added some carriage door hardware. Not only can you find it at any home improvement store, but it also comes in different variations.
All it takes is only one coat of glazing, the garage door is finished and just needs a couple of days to cure.
Since a rustic look was what we were going for, we also added some carriage door hardware. Not only can you find it at any home improvement store, but it also comes in different variations.


