Y'all have been so patiently waiting for my kitchen update and today's the day! We started a month and a half ago and have been working harder than ever before to get this project done, but as with everything DIY, there are hang-ups that happen. I'm so excited to share my husband's hard work on our gorgeous floor and a secret to getting budget window treatments for your home. Yay! To catch some of you up to speed, you can read all about the start of our kitchen remodel HERE, and this is our starting point when we bought our home in 2003. Outdated Kitchen Remodel with New Flooring by Prodigal Pieces | www.prodigalpieces.com

THE SECOND BEFORE

This is where we left off before starting our latest remodel... Kitchen Remodel Before by Prodigal Pieces | www.prodigalpieces.com ...with our old vinyl floors... Worn Out Vinyl Flooring by Prodigal Pieces | www.prodigalpieces.com When we bought the home, the dining area had been converted from a screened in porch and we took out a wall to the two rooms could flow. With that there was a transition in the floors that was not very good, and there were 4 different layers of old flooring to deal with. Repairing Transition from Two Kitchen Floors | Prodigal Pieces | www.prodigalpieces.com

*post sponsored eFaucets  (see full disclosure)

We had to build up the one floor to match the plane of the other and that was no easy task because it also had another three transitions into our laundry area. What a chore! Working at Night on Kitchen Floor | Prodigal Pieces | www.prodigalpieces.com

FLOORING

For us it wasn't just "lay down some tile" because we are here 24/7. We had to lay down a path let it cure and then grout leaving a space to walk, then switch spots. It was a long process for sure that required patience from everyone. Kids Watching While Dad Mixes Mortar for Tile Floor | Prodigal Pieces | www.prodigalpieces.com I wasn't much help during this stage because my littlest wouldn't have anything to do with it, so it was all my husband. You can best bet I'm itching to jump in!! We are in love with the new look and can't believe how much lighter and clean it all feels. Now we just need budget window treatments. View of Kitchen from Steps | Prodigal Pieces | www.prodigalpieces.com One other headache were these steps. The room adjacent to our kitchen is our family room that used to be a garage. The steps basically needed rebuilt and done from the front face of the bottom step. Porcelain Stone-Look Kitchen Tile by Prodigal Pieces | www.prodigalpieces.com Our temporary plastic table is going to eventually be our open frame bar (or peninsula) and those bar stools are going to get a new look too. Farmhouse Industrial Style Kitchen Remodel Update by Prodigal Pieces | www.prodigalpieces.com

WHAT NEXT

And this bench I found to redo is also temporary until we complete our built-ins. You can see how I eventually refinished it HERE. Farmhouse Style Bench in Kitchen | Prodigal Pieces | www.prodigalpieces.com While our laundry area will have the shelves retrofitted to hold a utility tub. I can't wait! Laundry Room Before | Prodigal Pieces | www.prodigalpieces.com As for me, I have been busy homeschooling, running my business and taking custom orders ever since I redid and sold our buffet that was in the start of our kitchen. Seems this buffet makeover has caused quite a stir and they're in demand. Vintage Duncan Phyfe Sideboard Gets Makeover by Prodigal Pieces | www.prodigalpieces.com I also have been causing a stir myself. First, I went to take down the faux barn beams that the previous owners installed, with the intention of just lightening their color. Faux Barn Beams in Kitchen | Prodigal Pieces | www.prodigalpieces.com Removing Faux Barn Beams in Kitchen | Prodigal Pieces | www.prodigalpieces.com But...(hee hee hee) once down, my kids and I loved how much open it felt and brighter too, so they came down and are staying down. This is before I tore down the awful sheetrock. Ceiling Before Tearing Down Sheetrock | Prodigal Pieces | www.prodigalpieces.com This is what the ceiling looks like bare bones. What fun! Kitchen Ceiling Restoration | Prodigal Pieces | www.prodigalpieces.com

JUNK FINDING

I've found all sorts of fun stuff, including a socket I didn't know was there and now I can finally center our fixture. Makes sense, right? Thankfully, my husband was game and new we needed to make it right. I am putting up beadboard and creating a coffered ceiling and can't wait to show you the next steps. My other changeups are this...I talked my husband into letting me get a gas cooktop instead of our electric range. I called my plumbing friend to come see about giving us an estimate to install a gas line, and he found we already have a line. Yippee!! Gotta love a woman's intuition. hee hee. So this old range will no longer be there, but instead my new cooktop sitting in storage and mounted in butcher block countertops. And we will also be building a custom range hood. You can see what I did with those upper cabinets as I repurposed them into storage bins, table centerpiece, and chalkboard. Electric Range Being Replaced by Gas Cooktop | Prodigal Pieces | www.prodigalpieces.com So you may be wondering about my oven. Well, I've decided to ditch our dishwasher for a double wall oven instead. I even bought a new dishwasher to replace this one. Ah well. Here is where our ovens will go. Old Portable Dishwasher in Kitchen Remodel | Prodigal Pieces | www.prodigalpieces.com

GOOD THINGS

My dishes will now be washed by hand in my new (old) farmhouse sink found on Craigslist. White Cast Iron Porcelain Kohler Farmhouse Sink | Prodigal Pieces | www.prodigalpieces.com And topped off with this gorgeous antique brass faucet from eFaucets. eep! Antique Brass Kitchen Faucet by eFaucets | Prodigal Pieces | www.prodigalpieces.com I will be building our lighting with these old barn enamel shades... Old Barn Enamel Shades in Kitchen Remodel | Prodigal Pieces | www.prodigalpieces.com ...paired with these antique clamps. Love me some rustic goodness. UPDATE: Lighting is done, and I share the how-to with you in this post. Antique Wooden Clamps Repurposed as Light Fixtures | Prodigal Pieces | www.prodigalpieces.com

WINDOW TREATMENTS

Another change-up is our window treatments - the one thing I could work on while the floor is being laid. For the entire time we've lived here, I've only had some basic mini blinds up in our dining area and never gave a hoot. I liked being able to see my kids out in the back yard and let in all the natural light. Dining Area Windows Before | Prodigal Pieces | www.prodigalpieces.com These are mini-blinds from a local chains store and only cost about $7 each. They do want we want and have served us well. I decided to change it up and get bamboo roman shades to add a little more texture to the room and a natural element. Those things cost $24 each and I had a hard time spending that. Funny thing is, the moment I hang them up, I say, "no." They are bulky AND you can see right through them!! What was the point of spending that kind of money for no privacy? So, I found they made liners to add which cost another $12 a piece. (here is where I get that sinking feeling - know what I mean?) I am determined to do something different. However, there is no way I am spending $300 to replace perfectly good window treatments I already have. What's a girl to do? Create a home hack, or course. Here's what I did for budget window treatments...I kept one of the shades and returned the rest to the store. Bamboo Roman Shade in Box for Home Hack | Prodigal Pieces | www.prodigalpieces.com

MORE DIY

Because these shades already had a built-in valance, I removed it and decided to use that as my guide. I rolled out the shade and removed the valance by flipping it up and taking out the staples that held it in place. Rolled Out Bamboo Shade | Prodigal Pieces | www.prodigalpieces.com Removing Shade Staples for Window Treatment | Prodigal Pieces | prodigalpieces.com Now the original valance is separate from the shade. Bamboo Valance Removed for Window Treatment | Prodigal Pieces | www.prodigalpieces.com Next, I flipped the shade over and removed all the rings and strings that pull the blind up. Removing Bamboo Shade Rings | Prodigal Pieces | www.prodigalpieces.com Starting from the bottom, I removed the piece of wood that weighs the shade down using scissors. Cutting Bottom of Bamboo Shade | Prodigal Pieces | www.prodigalpieces.com When cutting, a few of those bamboo pieces will fall out and that is okay. Save to use for a later project (same for those rings you just took off too!) Loose Bamboo from Cutting Shade | Prodigal Pieces | www.prodigalpieces.com Since the original valance is about 6" high, I add 2" to account from a top and bottom finished edge. After cutting a section, I use a large stir stick for a 5 gallon bucket to mount my valance. If you window is larger, you can use a thing strip of wood, like a furring strip found at home improvement stores.

NEXT STEPS

Pre-drill the ends of the stir stick with a drill about 1-2" in from the outer edge so they will be ready to mount when done. Predrill Budget Window Treatments | Prodigal Pieces | www.prodigalpieces.com Using the top edge as a guide, apply a bead of glue with your hot glue gun to the stir stick and center it on your valance. Applying Stir Stick with Hot Glue | Prodigal Pieces | www.prodigalpieces.com To create a finished edge, fold up the bottom to match the same height of the original valance you took off. Glue down with your hot glue gun. Assembling Bamboo Valance | Prodigal Pieces | www.prodigalpieces.com Again, using your drill, start a your screws in the holes making it easier to mount. Nothing like dropping screws all over while trying to hang window treatments, eh? Predrilling Screws into Budget Window Treatments | Prodigal Pieces | prodigalpieces.com Since each window is different, just line up your valance on center and mount the valance in front of your mini blind with the bamboo panel draping over the front of the stir stick. Attaching Faux Bamboo Budget Window Treatments | Prodigal Pieces | prodigalpieces.com Faux Bamboo Budget Window Treatment by Prodigal Pieces | www.prodigalpieces.com Not only did I get to keep the blinds I already had, but I also saved close to $300. SCORE!! The self-made valances from one bamboo shade hide those boring mini blinds. Also, they give the appearance that I have the window treatment of bamboo shades.  DIY Budget Window Treatment with Faux Bamboo Shades | Prodigal Pieces | www.prodigalpieces.com 
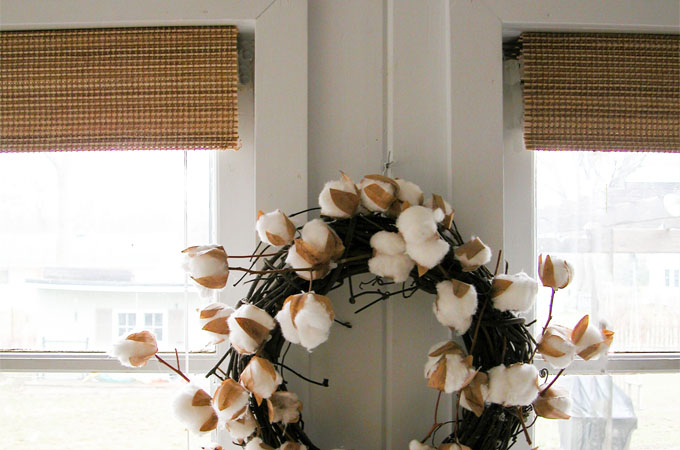
If you love that cotton stem wreath, I did that plus another arrangement for less than $4. Come see the video tutorial! I think sometimes we are caught up in getting the look. Then, we end up spending more than we need to. I typically am a DIY girl but know that not everyone is that way. My hope is that this inspires you to try to create the look you want for less with budget window treatments. DIY Budget Window Treatments - A Home Hack by Prodigal Pieces | www.prodigalpieces.com Our kitchen remodel is continuing and shall be done soon as we are past the hard part. See the full reveal HERE! Do you want to see this one-legged wonder makeover (aka a foot stool I found curbside). Isn't it cute? not. Come on over HERE. Curbside Vintage Footstool Gets Makeover by Prodigal Pieces | www.prodigalpieces.com blog signature

Also, more projects like my budget window treatments:

Repurposed Kitchen Cabinets become Home Decor by Prodigal Pieces | www.prodigalpieces.comBudget-Friendly French Farmhouse Master Bedroom Makeover by Prodigal Pieces | www.prodigalpieces.com


Janet (Shabbyfufu)

Shared publicly - 2016-03-26 08:50:33

What a project...and I am amazed at all that you do, accomplish and continue to do. It's going to be so worth it!

debbiedoos

Shared publicly - 2016-03-26 08:50:42

Larissa, you are amazeballs!I love teh window treatments. In fact, I want to do something similar because I am tired of dusting slats!

Bliss

Shared publicly - 2016-03-26 08:52:50

That is quite an undertaking in a large space, and it cracks me up you got out that crowbar and tackled those beams yourself.

Angela Kraeske

Shared publicly - 2016-03-26 08:53:19

It's looking great, Larissa! I love your cabinet color, faucet, and floors. And that's such a genius way to update the look of your mini blinds!

DebraShoppeno5

Shared publicly - 2016-03-26 08:56:52

I can't wait to see the end result. The floor looks wonderful. I am sure you are so happy for it to be uniform throughout the area. And the job you did on all of the other projects, wow I don't know how you do it.

Corinna - A Designer At Home

Shared publicly - 2016-03-26 08:58:47

Oh Larissa, everything is so perfectly you. The floors, that beautiful faucet. The sink and the wreath! It's all so beautiful and so you.

Kimm at Reinvented and RoadKill Rescue

Shared publicly - 2016-03-26 09:03:02

Larissa, you are amazing, and so is your kitchen. I love learning from you and your awe inspiring imagination. The tile looks fantastic!!

Kim

Shared publicly - 2016-03-26 09:05:10

Wow, lots of work in the kitchen, that's quite a transformation! I love what you did with the windows. Form and function...creative and inexpensive. Love it! :)

Stacy @ Anastasia Vintage

Shared publicly - 2016-03-26 09:08:19

I continue to be amazed at all you and your family are able to accomplish. Looking forward to seeing more of your progress! :)

Jessica | Petal + Ply

Shared publicly - 2016-03-26 09:09:08

Wow! You guys are making awesome progress. Totally understand renovating while living in your space. That's why we've held off on refinishing some of our floors. Thankfully we were able to get our kitchen in complete working order before we moved in. Still need to do backsplash tile and open shelving though. Excited to see your finished space. Love your plans and the finishes you've picked out. Faucet....swoon!

SheilaG- PlumDoodles

Shared publicly - 2016-03-26 09:10:55

Wow, the new tile looks so pretty. Can't wait to see what you do with the light fixture. I'm sure you can't wait to see it all finished.

pam

Shared publicly - 2016-03-26 09:14:33

Cute trick on the window blinds! Can't wait to see your faucet and sink installed, that is one fancy faucet :) Love the finish on it!

Larissa

Shared publicly - 2016-03-26 09:22:24

Me either, Pam! ;) To have this clutter gone will make my day. Thanks!

Larissa

Shared publicly - 2016-03-26 09:22:58

Thanks, Sheila! Yes, living out of boxes and trying to keep the kids tidy is a chore, but will be well-worth it.

Larissa

Shared publicly - 2016-03-26 09:23:42

Thanks, Jessica! Yes, a new build would be nice to have it done before you're in it for sure. We're moving on to our backsplash soon too!

Larissa

Shared publicly - 2016-03-26 09:23:58

Thanks so much, Stacy!

Larissa

Shared publicly - 2016-03-26 09:24:23

We are so happy we are able to DIY it. Thanks, Kim!

Larissa

Shared publicly - 2016-03-26 09:25:06

awww...thanks, Kimm! The tile is perfect and I can't wait to get more of my end done.

Larissa

Shared publicly - 2016-03-26 09:25:33

What a wonderful compliment, Corinna. Thank you! :)

Larissa

Shared publicly - 2016-03-26 09:26:02

Yes, love that there are no more bumps and unevenness in there...no more tripping! Thanks, Debra.

Larissa

Shared publicly - 2016-03-26 09:26:33

Thanks, Angela! I can't wait to put up our ceiling and faux brick walls...not to mention the subway tile too. eep!

Larissa

Shared publicly - 2016-03-26 09:27:09

You know it. tsk. I do most of that kind of work, but when mortar is involved with kids around, that's up to hubby. ha!

Larissa

Shared publicly - 2016-03-26 09:27:34

Awesome! Thanks so much, Debbie! (and I hear ya on the slats)

Larissa

Shared publicly - 2016-03-26 09:28:04

Thanks, Janet! We are excited to move on to the next phase.

Pili

Shared publicly - 2016-03-26 09:56:52

You are not from this planet, Larissa! I don't know how you can do so many things, and doing them right! Love your new shades, and can't wait to see more of your kitchen!

Larissa

Shared publicly - 2016-03-26 10:01:48

hahaha...love it!! Thanks so much, Pili!

Evey

Shared publicly - 2016-03-26 10:20:33

WOW! It certainly is cunning along beautifully! Love those new floors! Awesome job!

Meghan @ The Twin Cedars

Shared publicly - 2016-03-26 10:33:21

Your kitchen "before" has almost the exact same layout as mine. Starting that project next fall but can't wait. Love what you've done so far! I was so bummed at first when you removed the beams but you're sooo right...opens everything up and looks fresh! Great window treatment hack! Shades are so expensive. Love it!

Lani

Shared publicly - 2016-03-26 10:39:05

It's looking amazing Larissa! I can't wait to see how the kitchen ceiling turns out! And the curtain hack is fabulous!

Amy | Canary Street Crafts

Shared publicly - 2016-03-26 10:39:39

The new tile flooring is gorgeous, Larissa! Your window treatment hack is genius too. Can't wait to see the next steps in your kitchen makeover!

Amy

Shared publicly - 2016-03-26 10:50:27

You guys are doing an amazing job updating your kitchen! The new tile reminds me of a Tuscan fresco. I can't wait to see what you do next. Very inspiring!!

Patty

Shared publicly - 2016-03-26 10:52:49

Your new floor is beautiful, your poor hubby working overtime, then coming home and working on the floor, what a man! and your window treatments are amazing. It just always amazes me how creative people figure things out and make it work. I don't know where you are planing to put your bar, but is there anyway you could mount your dishwasher under the bar? I just cant wait to see your kitchen ceiling and lighting, well actually I can't wait to see it all completed, it is going to be gorgeous.

Tania // Run to Radiance

Shared publicly - 2016-03-26 11:07:46

You guys did a great job! What a transformation! I love that tile. :)

Christy @Confessions of a Serial Do-it-Yourselfer

Shared publicly - 2016-03-26 11:13:49

Your floor turned out amazing, Larissa!! That looked like a ton of work. I know you're so glad it's done. You were so clever to hack that one shade to create valances for all the windows...that's my kind of project...and I have that drill too...best ever!! Can't wait to see all the changes you still have in store! It's going to be amazing!! XO

Wendi @ H2OBungalow

Shared publicly - 2016-03-26 11:18:47

You're makeover is as amazing as you are! Such creativity on a budget...LOVE! I too tiled my whole house from Floor & Decor! Love them and the products. Great job and hooray for you getting a gas stove...it's so much better to cook with!

Mary-the boondocks blog

Shared publicly - 2016-03-26 11:37:05

Larissa, the floors look fabulous! What a huge difference thanks to that talented hubby of yours. And the ideas that you have will truly transform the place. I can't wait to see how it's going to turn out! I know you have a great vision in your head and you will achieve it!

RandiG at FrugElegance

Shared publicly - 2016-03-26 12:49:05

Fabulous makeover just the way we like it - FrugElegant style! Beautiful!

Nancy @ Artsy Chicks Rule

Shared publicly - 2016-03-26 14:26:55

Oh my goodness!!! It's all looking so wonderful! I love your brilliant shade hack too! Can not wait to see the rest!

Vicki and Jennifer Fenton

Shared publicly - 2016-03-26 15:33:15

WOW! We don't even know where to begin! What a fab makeover...all of your creative decorative touches are evident and make this space so much more special!Love the flooring and your window shade hack! great job!

simple nature decor

Shared publicly - 2016-03-26 17:27:53

amazing transformation,I can see you put your heart and soul into this Maria

Larissa

Shared publicly - 2016-03-26 17:38:06

Thanks, Evey! Yes, we love the floors and how much brighter everything is.

Larissa

Shared publicly - 2016-03-26 17:39:27

Ooh...excited for you! Yes, I forgot to mention that the beams also had a weird transition point to the laundry where they didn't put up sheetrock and we were either going to have to put up more or take the old down. I wanted it open and light, so down it came. We're so excited!

Larissa

Shared publicly - 2016-03-26 17:40:06

Yay!! Thank you, Lani. As you can imagine, we are excited to and think the rest will come along quickly.

Larissa

Shared publicly - 2016-03-26 17:40:54

I love the stone-look tile and boy is it durable! My kids will definitely give it a run for its money. ;) Thanks!

Larissa

Shared publicly - 2016-03-26 17:41:32

Thanks, Amy! I wanted an old world look, so I'm happy to hear you think of that style upon seeing it.

Larissa

Shared publicly - 2016-03-26 17:42:57

Oh yes, he's been tired and we haven't worked this hard since our patio makeover in the fall. The bar is going where that temporary table is (where the bar used to be) and honestly, we don't need a dishwasher as we wash by hand anyway. We can always add one later if we want to. Thanks for the love!

Larissa

Shared publicly - 2016-03-26 17:43:15

I'm happy to hear it, Tania!

Larissa

Shared publicly - 2016-03-26 17:44:12

You are awesome to compliment, Christy. This week I will be getting my DIY on in there and am so happy to have my other projects behind me. Thank you!

Larissa

Shared publicly - 2016-03-26 17:45:09

Ooh...yay for you, Wendi! They are a great company and I was so very impressed with their stock availability on site. I'm seriously headed back for more in for our family room. ;)

Larissa

Shared publicly - 2016-03-26 17:46:03

Thank you so much, Mary! Yes, he is working hard as we all are behind the scenes so he has a spare minute to keep it going. I'll be working like crazy this week on the ceilings, then onto the walls. I can't wait!

Larissa

Shared publicly - 2016-03-26 17:48:55

Thank you, Maria, for the compliment and for "getting it". :)

Larissa

Shared publicly - 2016-03-26 17:49:24

You made me giggle...thank you, girls!! :D

meegan

Shared publicly - 2016-03-26 18:13:06

What a lot of hard ork and a beautiful transformation. The window treatments are just the touch you needed. Thanks for the ideas and for sharing. You never cease to amaze me.

Karen @ Dogs Don't Eat Pizza

Shared publicly - 2016-03-26 18:25:45

I can't believe how much bigger and brighter the kitchen looks without the faux beams! I'd leave them off, too. It's really starting to take shape!

JenWoodhouse.com

Shared publicly - 2016-03-26 19:21:52

Wow!!! What a transformation! Awesome job!

heather

Shared publicly - 2016-03-26 19:48:10

Looks beautiful Larissa!!! So many wonderful details. Congrats on another job well done.

Erin Spain

Shared publicly - 2016-03-26 20:10:49

Great job! Can't wait to see it all finished! You've made great progress so far.

Marie, The Interior Frugalista

Shared publicly - 2016-03-26 21:16:43

You blow me away girl! The floors look fabulous and the ceiling definitely better without the beams (can't believe you took those down yourself). Your plans sound amazing and I can't wait to see how this room progresses. Where you lost me though is that YOU GOT RID OF THE DISHWASHER. You amaze me with what you can accomplish while homeschooling, raising six kids, and running a business but adding washing dishes too - where do you find the time! Wait a minute, you have six kids...that's 12 sets of hands (okay minus the babies) 10 sets of hands that can wash dishes.

Larissa

Shared publicly - 2016-03-26 21:44:49

Thank you for stopping by, Meegan. We are pleased with it so far and can't wait to show everyone our finished product...and enjoy it ourselves. ;)

Larissa

Shared publicly - 2016-03-26 21:45:47

It seriously was amazing how much brighter it is in there now. I've always wanted a light tube to make up for it, but not I have beamless ceilings that do the trick! ;) Thank you, Karen.

Larissa

Shared publicly - 2016-03-26 21:46:04

Thank you, Jen!

Larissa

Shared publicly - 2016-03-26 21:46:40

Thanks for the support, Heather! We are happy to move onto the next stage.

Larissa

Shared publicly - 2016-03-26 21:47:22

Thanks, Erin! The next part will move quicker (thank the good Lord!) and I can do more on my end...I can't wait. ;)

Larissa

Shared publicly - 2016-03-26 21:48:39

bwahahahahaha....you nailed it, Marie!! We end up washing the dishes before putting them in the dishwasher, so we just don't use it much anymore and now there's no complaints about enough glasses or silverware. Problem solved. ;) Thank you so much for the support!

Lynn Spencer

Shared publicly - 2016-03-27 07:07:39

Larissa. the question that immediately popped in my head was "When does she sleep?" The transformation from the first kitchen to where you are now is remarkable...and I love that each step along the way further emphasizes the personality of you and your family. And that picture of the entire family standing around watching your husband work on the floor...priceless. I know you are loving your new floor...really freshens up the space...and your new valances. Very clever. Well done on all fronts! Hugs and wishes for a lovely Easter. Lynn

Paula@SweetPea

Shared publicly - 2016-03-27 07:55:12

Your kitchen is looking amazing, Larissa. Your new tile floors look so nice and taking down the beams does make the room look larger. I love your sink and can't wait to see it in place with that gorgeous faucet. Your new window treatments look great and you were so smart to get the look that you wanted for a great price.

Betsy

Shared publicly - 2016-03-27 10:27:07

Oh my goodness! What a beautiful space you've been creating. Love every part of it! Your hard work and dedication is a real inspiration.

Kathy Owen

Shared publicly - 2016-03-27 10:51:58

You guys are doing an awesome job on the makeover. I love that you took the faux beams down!! Yea!! The tile is beautiful. I want some just like it!

Susie form The Chelsea Project

Shared publicly - 2016-03-27 21:03:19

So happy to see all of this wonderful progress! The tile looks great. And the rooms look bigger and more airy! Your window treatment trick is awesome, too. I'm filing that away for later. So proud of you and so happy for your family! Looking forward to the next progress post.

Katrin

Shared publicly - 2016-03-28 03:37:36

Hi Larissa, your kitchen looks so so nice! I love those cabinets!!! And what a transformation, great job!!!

Arielle

Shared publicly - 2016-03-28 07:51:50

What an amazing transformation! It looks fantastic, and you're definitely inspiring me to tackle our own kitchen. And love that cotton wreath!

Larissa

Shared publicly - 2016-03-29 05:38:32

Oh, thank you! Kitchen's are the heart of the home and when they are redone it can be a pain to do , but so worth it in the end. Thanks for the love, Arielle!

Larissa

Shared publicly - 2016-03-29 05:38:52

Thank you, Katrin!

Larissa

Shared publicly - 2016-03-29 05:39:38

I'm happy to hear it, Susie! Thank you so much for stopping by.

Larissa

Shared publicly - 2016-03-29 05:41:20

It's funny how something can make such an impact, but I never really like those beams, just didn't want to mess with what was behind them. ;) Thanks so much, Kathy!

Larissa

Shared publicly - 2016-03-29 05:41:41

You are too sweet, Betsy. Thank you!

Larissa

Shared publicly - 2016-03-29 05:42:37

Thank you, Paula! Now it's time to get the ceiling and lighting done, then onto the walls for me. Yay!

Larissa

Shared publicly - 2016-03-29 05:43:45

hahaha...I get asked the all the time and the answer: Never. Seriously, I'm a confessed workaholic, but love staying busy! Nothing like having 6 kids to make that happen. Thanks so much for stopping by, Lynn! :D

Karen Marie Kedzuch

Shared publicly - 2016-03-31 12:16:28

Larrisa. Who doesn't love saving money? I love using another item to make a template for my DIY projects. One of my favorites is upholstery and window treatments. You have quite the challenge going in your home. I am sure it feels wonderful to have your window treatments done and looking sleek and beautiful. Happy Creating, Karen Marie

Larissa

Shared publicly - 2016-04-02 05:58:06

I honestly don't know. tee hee. Thanks for stopping by, Karen Marie!

Arlene

Shared publicly - 2016-04-11 21:56:55

It's looking great - lots of work, but worth it in the end! So I am assuming you left the mini-blinds and the valances just cover them? Or do you not need the privacy of blinds here?

Larissa

Shared publicly - 2016-04-12 04:04:29

Yes, indeed. :) Yes, kept the mini blinds for privacy and light filtering in the summer evenings, but they worked better than the natural shades for those reasons. What a saver!

Carol

Shared publicly - 2016-05-11 13:52:20

I am amazed that with all you do, you have time to answer every single e-mail. No one will ever call you lazy!

Robin

Shared publicly - 2016-05-11 14:58:02

I am really new at this DIY but love the ideas. I have what is probably a silly question. On the windo treatments, you glued a stick on back of the valance and then inserted screws into the wood. Since the screws are on the back of the valance, how do you mount it and what are you attaching it to? Keep in mind I'm new and have never even hung a blind!! I know, pitiful, right? ? Thanks!

Larissa

Shared publicly - 2016-05-11 17:32:35

No worries. :) The stir stick is attached flush to the trim (or casing) in front of the mini blind with the valance cascading over the stick. Use my finished photos for reference. If you have more questions, please feel free to email me at larissa@prodigalpieces.com

Larissa

Shared publicly - 2016-05-11 17:33:20

Unfortunately, that word is not in my vocabulary. :D

Mary

Shared publicly - 2016-05-11 18:03:01

Love your idea! I also have boring miniblinds. I am going to try your idea, it looks great! Thank you so much.

Paula Brady

Shared publicly - 2016-05-11 23:48:12

Very inspiring. I'm the Dumpster Diva of my HOA I've got a few " finds "waiting for a makeover, you gave me some great ideas, the product of practiced patience reaps results.

Larissa

Shared publicly - 2016-05-12 05:40:27

You go girl! :D

Larissa

Shared publicly - 2016-05-12 05:47:23

I love to hear it, Mary. Have fun!

Deborah

Shared publicly - 2016-05-13 23:51:43

Quite simply...you are a genius!

Larissa

Shared publicly - 2016-05-14 07:37:24

blushing....Thank you!

Ivory

Shared publicly - 2016-06-03 23:11:15

All I can say is, you are so blessed to be so wonderfully talent and creative, because those talents and creative are beatifully shown here.

Ivory

Shared publicly - 2016-06-03 23:12:30

I love your saying. This is exactly how I feel.

Larissa

Shared publicly - 2016-06-04 05:54:15

Thank you, Ivory, for making my day sweeter. :)

Jane Doe

Shared publicly - 2017-06-22 08:43:01

Oh, Larissa, I love this post; I too must have the natural light that comes through my windows and I don't really like curtains. This is the perfect solution and the bamboo valance dresses them up without being cutesy, (is that a word? haha). This is my first comment on your amazing blog and may I say that yours is the only one so far that I check every day? I am crazy about your designs and your ideas give me so much inspiration. Thanks for sharing your talent with those of us who have none in the Decor world... (that would be me!). A big hug to you from Georgia!

Larissa

Shared publicly - 2017-06-23 14:35:41

You are so sweet to leave a comment. My day has been made that you have said such kind words. Thank you!

Sign Up To Comment